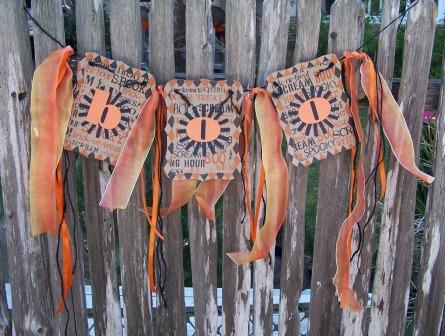
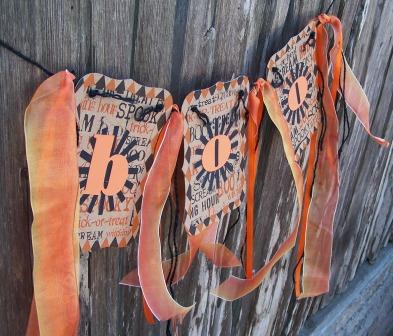
Holly, from 504Main.com and thediyclub.com, made this BOO Banner Tutorial using Canvas Corp products. This would be absolutely perfect anywhere for Halloween decor!
I am a little slow to the game here, as it pertains to Halloween,
but my kids are “encouraging me” to get movin’!
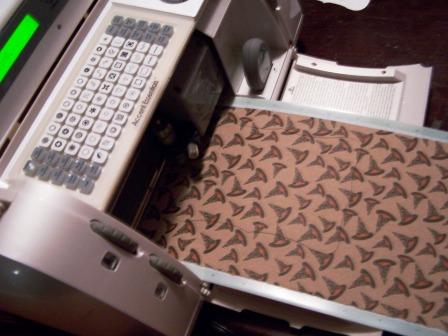
So today I pulled out the Cricut and made a BOO banner
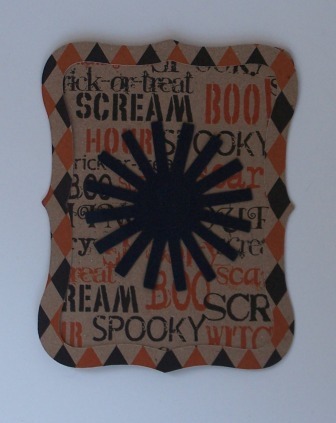
I adore this paper from Canvas Corp and have had my eye on it for awhile…
It is Fun and such a good quality.
My daughter specifically wanted a banner that said “Boo.”
I was trying to be more witty or original, but sometimes you just gotta go with it!
(don’t those “O’s” look like cat eyes!)
This is pretty simple and can easily be replicated with scissors and chip board letters (if you do not have a Cricut), or with different shapes and fonts (if you do have a Cricut).
Supplies
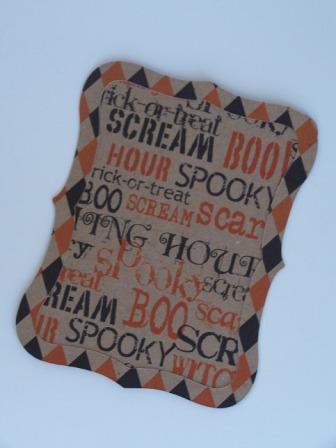
2 sheets of
Canvas Corp Spooky Diamonds on Kraft (2x 12)
1 sheet of orange paper/stock (12 x 12 or 8.5 x 11)
1 sheet of black paper/cardstock (12 x 12 or 8.5 x 11)
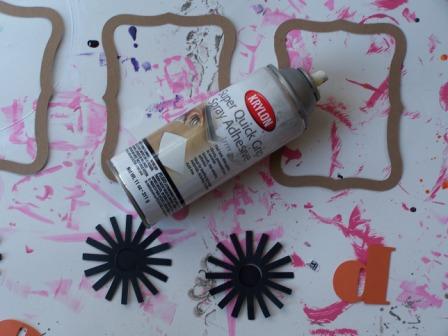
Krylon Super Quick Spray Adhesive
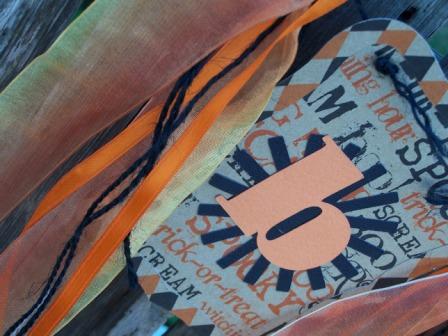
Orange ribbon, about 1.5 yards
Optional: other various ribbons in orange and black for adornment
Tools
Cricut or scissors/X-acto
Cricut Cartridge: Essential Elements and Cindy Loo (I only have 3 cartridges, so I was going with what I have. You could use anything else)
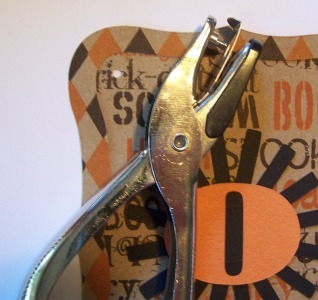
Hole punch (mine is a 1/8″ hole punch, but regular size can work)
DIY IT!
1. Run the Kraft Spooky Words paper through the Cricut using the frame shape at 5″ 3 times (Essential Elements cartridge)
2. Run the Spooky Diamonds on Kraft paper through the machine using the same frame, but at 4.5″ (Essential Elements cartridge)
3. Cut black paper using the “star” at 3″ (Essential Elements cartridge)
4. Using the Cindy Look cartridge, cut orange paper…”B” – “O” – “O” at 3″
5. Separate the frames from the insides (I saved the other part of the cut to use for something else). The stars also have a cut out center but I left the center there.
6. Layout the pieces face down on a protected surface and cover the back of the pieces with adhesive, using the Krylon adhesive spray.
7. Apply the 4.5″ frame to the 5″ inner piece (I know it sounds funny, but it fits)
8. Apply the “star” to the center of shape from #7.
9. Apply the letter on top of the “star,” centered.
10. Punch one hole it each of the top two corners of the finished shape
11. Cut jute: 2 pieces at about 10″ and 2 pieces at about 20″
12. From the back side insert jute through the hole, and with the end of the front of the shape tie about 5 knots in the same location:
*For the left hole on the “B” AND the right hole on the last “O,” use a 20″ string.
*Between the right hole of the “B” and the left hole of the first “O” use the shorter piece.
*Between the left hole of the “O” and the right hole of the last “O” use the shorter piece.
*As you tie the 2 pieces on the inside of the BOO (between the B and O and the O and O) try to keep the distance between the letters the same – just eye it. I have about 2.5-3″ between each letter.
13. OPTIONAL: Cut various lengths of extra ribbon for adornment – you need 4 sets – tie one on each end; tie another one between each letter. You can simply tie it around the string.
That’s it – easy and cute and Jules loves it…
so that is what matters.
In fact she loves it so much we had to make a second one…
but slightly different…
…she wanted the witch hat paper!
(I think that one is going
to pre-school)


'Halloween Banner by Holly' have 3 comments
October 27, 2011 @ 1:10 am Lynda in calif
Very cute, nothing wrong with jumping on the late train! You did an awesome job. That paper is gorgeous!
October 27, 2011 @ 8:53 am martha galvez
I love it!!! Great job and ongrats on using what you have!!! Going to try this out!!! TFS!
October 28, 2011 @ 8:13 pm LinhC
I love banners! I think the first one has “eyes”. 🙂